How to get it right: floor joists
The next generation of engineered first floor joists offers greater spans and easier fitting of services. While hours can be saved removing the need for notching of pipework and drilling for cables, the floor joists still need careful attention to ensure they work correctly and as they are designed.
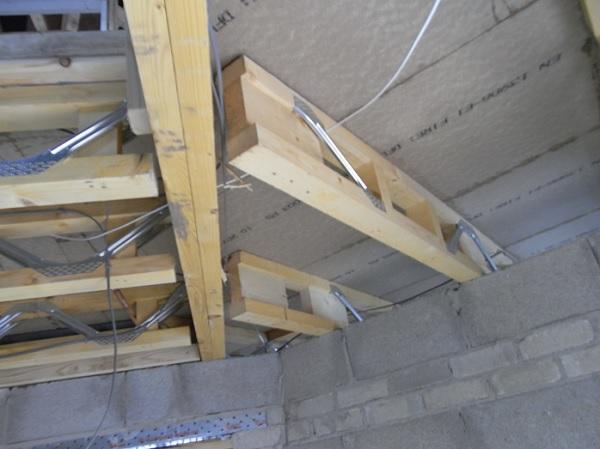
The posi-joists in this image are designed so that the top chord transmits all the weight. That is why there’s a gap where the bottom chords to the left are not in contact with the trimmer beam.
The problem with this floor joist image
The gap is too big! It should be a maximum of 6mm and if a stud wall is to be built beneath, there should also be a plasterboard noggin to prevent cracking at the junction. There should also be noggins between the top chords to prevent movement.
The joists to the right of the trimmer correctly have a timber fillet at the point at which they sit on the wall to stiffen the joist through its depth. But they should really be seated on a timber batten rather than the blockwork.
The cantilevered ends should be fixed to the trimmer beam with joist hangers to remove any bounce in the floor to prevent any cracking of the first floor finishes.
This will also minimise creaking, which is one of the biggest frustrations for new house owners.
Further information
Found this interesting? Try How to build level floors and browse our 'How to get it right' articles.
Please Note: Every care was taken to ensure the information was correct at the time of publication. Any written guidance provided does not replace the user’s professional judgement. It is the responsibility of the dutyholder or person carrying out the work to ensure compliance with relevant building regulations or applicable technical standards.
Sign up to the building bulletin newsletter
Over 48,000 construction professionals have already signed up for the LABC Building Bulletin.
Join them and receive useful tips, practical technical information and industry news by email once every 6 weeks.
Subscribe to the Building Bulletin


Comments
Posi-Joists
Submitted 6 years 6 months ago
1. The 6mm hold back of the bottom chord we show in our details if anything is too small. It is intended to be a target to aim for, gaps of 10 - 15mm are not a problem. Gaps less than 6mm can be a problem because due to tolerances on site this can readily become almost 0mm and then any small deflections in the joist will cause the bottom chord to foul the bearing.
2. Plasterboard noggins should be installed if there was a partition wall as you point out when, is there a partition wall in this case?
3. Perimeter noggings for deck support should be installed.
4. The long cantilever joists on the RHS of the trimmer should be secured to the trimmer beam, although angled bearing joists are not easy to install.
5. A better detail for the RHS joist would be to extend the top chord to sit on top of the trimmer beam, the same as the LHS joists.
Regards
Tony Fillingham
Reply
Submitted 5 years 11 months ago
Many thanks for the information and apologies for the delayed response. The points have been noted and will be incorporated in a future review of the technical information.
Barry, LABC
(No subject)
Submitted 6 years 6 months ago
We generally build with beam and block 1st floors and have for the first time used web joists.
At a 4.5m span and 100mm wide I was really disappointed to see how much they flex. I was talked out of having them at 450mm centres [we always put our trusses on at this] and was told due to the span and size of the joists there would be no problem running them at 600mm spacings!! Unfortunately there is too much spring/bounce in the floor and we are now having to look at how we can improve the situation!! Buyer beware!!
Regards,
Ben.
P.s. Handy to know about the 6mm gap at the end. I was concerned about this, and it possibly adding to the bounce!!
Webmaster note
Submitted 6 years 6 months ago
Closing an atrium style gap in the floor at first floor level
Submitted 5 years 8 months ago
Reply: Closing an atrium style gap in the floor at first floor
Submitted 5 years 7 months ago
For your specific project it would be best to speak to your local building control team who will be pleased to provide guidance and advice. You can find them by entering the postcode of your project in the 'find your council' search box at the top of our website.
Kind regards,
LABC
I joists built into masonry wall
Submitted 1 year 7 months ago
I also noticed upon inspection that the i joist, which is full span, is mounted in the inner skin of the masonry cavity wall, which I believe is against NHBC guidance, which I assume aligns with build regs?
This could be a serious problem for us. I fear if the flange is damaged, it cannot be replaced.
Please can you advise 1) if such timbers should be treated (i.e. timbers that are impossible to replace), as this will put my mind at ease somewhat as the water exposure seems minimal and 2) if mounting a full span i joist into masonry is permissible?
Thank you in advance.
LABC Response
Submitted 1 year 7 months ago
Thank you for your enquiry.
The following response is my opinion on behalf of LABC, it is not a definitive interpretation of the legislation and remains a matter for the relevant enforcing authority to determine.
Point 1: LABC would recommend that if you believe the I-joists have been damaged by the escape of water, they should be assessed by a competent structural engineer.
Point 2: Specific guidance in the Building Regulations on I-joists is somewhat limited. Broadly speaking, in my experience it may be possible to build I-joists onto the inner leaf of a masonry wall, save that their bearing must be sufficient and the end of the joists must be protected from damp and not compromise the airtightness of the dwelling - however the exact detailing and installation of I-joists should follow the manufacturer’s guidance and specification for the project.
Kind regards,
LABC
Ychwanegu sylw newydd